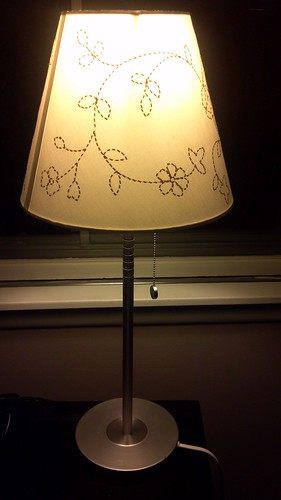
This is what the fixed lamp looks like back in its rightful place.
I was able to find a pull chain at the home improvement store. It was 3 feet long, so after I attached it to the lamp socket I cut off the excess with diagonal cutters.
Sunday, December 18, 2011
Fixed lamp
Monday, December 12, 2011
Lamp repair

 Renae has a lamp from Ikea that she uses in her room. The poll cord broke recently, so I took the lamp apart to see if out could be fixed.
It was pretty easy to get the lamp apart. The shade was held in place by a screw-on piece. Then, the bulb base was held in the stand of the lamp by another screw-on piece which was only finger tight.
By feeding the cord up through the stand, I was able to gain access to the base and reveal the point where the pull cord connects to the switch on the bulb base.
I'll be able to replace the pull cord, but I want to replace it with a chain that will not wear out so quickly.
 |
| Here's a close-up view of where the new pull cord will be attached. |
 |
| It's not obvious from these photos, but the silver sleeve where the pull cord is coming out of the base was not aligned to the white bushing on the outer part of the lamp. This is what caused the cord to break: by rubbing on the sharp edge every time it was turned on and off. |

Tuesday, August 9, 2011
Plumbing problem
I have two embarrassing things to write about today. The first is the length of time since an update on what's happening with the house. Yeah, it's been awhile. I'm not going to dwell on that, though. The other embarrassing thing is related to the first, though: A few months (more than 2, less than 3) ago, I heard a drip under my bathroom vanity. I just now (last weekend) got around to fixing it. Now you know my shameful secret. :-)
The drip wasn't from the faucet, it was from the drain. I had repaired a poor install in the kitchen last winter(?), and I'm starting to suspect the previous owners weren't the best plumbers. When I looked at where the drip was coming from, it seemed to be coming from right at the drain in the sink itself, so I suspected that the plumber's putty used to seat and seal the drain had failed. When I actually undid the drain, I found out it was a bit worse:
Looking at the pieces I also notice that it didn't seem that whoever installed it had used any teflon tape on the threads, either. I doubt that alone caused it to fail, but I suspect that the threads were over-tightened which caused the part to crack and fail.
The drip wasn't from the faucet, it was from the drain. I had repaired a poor install in the kitchen last winter(?), and I'm starting to suspect the previous owners weren't the best plumbers. When I looked at where the drip was coming from, it seemed to be coming from right at the drain in the sink itself, so I suspected that the plumber's putty used to seat and seal the drain had failed. When I actually undid the drain, I found out it was a bit worse:
 |
| From Plumbing problem |
So, I went back to the hardware store and got a replacement part, which was identical to what I had taken out:
 |
| From Plumbing problem |
There wasn't a whole lot to getting it back into position and reconnecting the trap and the drain plug mechanism. I did notice that I think the trap part was not exactly under the drain plug assembly. The additional stress that the part may be under might cause it to fail again sooner than it should, although I have my fingers crossed that it will last longer than the previous part.
If it does fail again prematurely, I'm going to add a flexible pipe section between the replacement assembly and the trap. I'm starting to believe that DIY plumbers that don't measure accurately should use at least one flexible fitting in the plumbing to relieve stresses on the glue joints. Only time will tell if my fix was good this time around.
If it does fail again prematurely, I'm going to add a flexible pipe section between the replacement assembly and the trap. I'm starting to believe that DIY plumbers that don't measure accurately should use at least one flexible fitting in the plumbing to relieve stresses on the glue joints. Only time will tell if my fix was good this time around.
Monday, March 14, 2011
World's worst wiring?
No matter how goofy the electrical might be in our house, it's nothing compared to this:
Worst Automatic Garage Door Opener Installation Ever - Watch more Funny Videos
Worst Automatic Garage Door Opener Installation Ever - Watch more Funny Videos
Saturday, February 12, 2011

Saturday, February 5, 2011
Speaking of critters
Before we left for Iowa for Christmas, Renae had made arrangements with the neighbors to have their 11 year-old son clear our driveway if it snowed while we were gone. These arrangements were made while Renae was out shoveling and talking to the neighbors the last time it snowed before we left. When we were driving to Iowa, she also mentioned that the neighbor had asked if we ever worried about mice getting into the bird feed we keep in the garage.
The three years I fed birds in Bloomington, and the two years we lived in Aurora we never had problems with mice. I had planned to get some storage bins for the feed ever since we moved in August, but I had never got around to it. But, every time I filled the feeders (about once a week) I checked the bags to see if they had been chewed open. Up to leaving for our trip home, there had been no sign of unwanted visitors.
But, getting back home from the trip meant the feeders needed to be filled. The first thing I saw was a pile of seed a little larger than could be explained simply by my own spillage. So, off to the hardware store I went.
I was short on time, so I went to the closest store, which happens to be Ace Hardware. I found their 5 gallon buckets, which were priced at $6.00. It seemed a little steep, but being in a hurry, I decided to go for it. There weren't any lids with them, so I went to the paint counter and asked for a few lids. It turns out that Ace wanted $3.00 for a lid! Yikes. They also had 24 quart pet food containers with sealing lids for the same price. So, I got a pair of those and a scoop for the feed. I still think it was overpriced, but I guess that is what I paid for the convenience.
Shower door project

This is what my shower has looked like for the past 3 weeks or so, ever since Renae discovered that water from the shower was leaking into the basement.
I had taken the door off of the frame when I was tracking down the leak. I had assumed that the door was improperly hung and that a simple adjustment would take care of water that was getting under the bottom of the door.
After talking to one of the employees in the Bath department at Lowe's, I learned that actually the door had been installed correctly. The real problem was that the door was not the right type of door to use in that shower. The shower head is opposite the door, and the pivot style door is designed to be used with a shower having the shower head on a side wall.
Because the pivot style doors are prone to letting water get through and there was going to be little hope of fashioning a decent fix, we decided to order a new door. We had always planned on replacing this shower door, since the door frame has a horizontal bar that you have to duck under going in and out of the shower. We thought it was going to be a project a few years down the road, though. But two weeks after placing the order, I had the new door in the back of the car.
Getting the frame off was pretty easy. I pulled the screws holding it together and gently pried the frame away from the tile. The silicone caulk held it pretty tightly in place, but I was able to get it off without scratching the tile.
The bottom part of the frame had about half a tube of caulk which was still wet underneath it! I took a photo of it:

I guess whoever installed it just squirted a ton of caulk through the pivot hole and figured it would dry eventually. Not so much, in this case. It does explain why there was a thin sheet of dry silicone covering the entire part of the inner door ledge, however.
Four hours later, and I have my new door installed:

Really it only took about an hour of measuring, drilling, leveling and fastening. The other three hours were spent going back down to the workshop to hunt down a tool I didn't think I would need, but found that I really did need.
Here's what I learned doing this project:
- Get all the tools that the instructions call for.
- Read the instructions twice before starting the project. I read through them once and it didn't make any sense. The second time through I started figuring it out. (Actually, reading the instructions is the number one thing that I've learned from every contractor I've ever worked with.)
- Covering the drain with a towel like Rich on "This Old House" does is a smart idea(r).
- Use the proper drill bit for the material you are drilling through. I used a masonry bit to get through the tile. The previous homeowner (probably) did not and ended up chipping the tile up pretty good. I tried to hang the door to cover the old holes as much as possible, but ended up sacrificing a bit of evenness from one side to the other to cover some of the holes. Not content to learn from someone else's mistake, I used the wrong type of drill bit to try to drill through the metal door jamb. I ended up destroying a drill bit in the process. (And having to make another trip to the workshop.)
- You can use the cardboard that the door came in to clean up your mess. All the parts of the other door went onto that box, which I dragged out to the garage.
Wednesday, January 26, 2011
Low humidity in the house

Today's photo is nothing special. We've been noticing a lot of the wood trimwork in the house has shrunk quite a bit in the dry Illinois winter. We're trying to alleviate the problem with a humidifier, but it has only been running for a few hours.
Tuesday, January 25, 2011
Handles added!

These cabinets have been in the basement since almost the first weekend we were moved in. I finally got the handles added this weekend.
The cabinets and handles are both from Ikea. Ikea sells a slick template for marking the holes for drilling to mount the handles. But the catch was, we wanted the run of doors to look like the handles were all continuous so they had a more "built-in" look. The template was not designed to center the handles in the vertical orientation, so I taped a piece of cardboard to the side so that I could have the template centered on every single door as I went down the line.
I was also a bit worried that the handles would look a little "wavy" since the doors are not all perfectly plumb. But, the "waviness" is most noticeable from this angle, which I don't think it too bad at all.
So all the worrying I did was really for naught, and the project only took about an hour and a half to complete. Should have done it months ago!
Monday, January 24, 2011
Homemade wall art project
Our home is slowly coming together. The boxes are (mostly) unpacked and we've pretty much got all the furniture we needed to fill the space. One thing that is we've been lacking is artwork for the walls. We have all the artwork we've had in previous places we've lived, but now we have more wall space to fill and some of the rooms use colors we've never used before.
Renae has wanted to hang fabric stretched over a frame on the wall for awhile now. Recently, I get a Kreg Jig Pocket Hole System , so I made her a frame for Christmas. She found a fabric at Ikea which really went well with the wall color and the rest of the furniture in the room.
Over the weekend we had some time to actually stretch the fabric over the frame. (We had to buy a staple gun, since we couldn't find our old one.)
You can see the pocket holes in the photo. We had the fabric facing up so we could approximately center it how we wanted.
Cutting it out.
We put a single staple in the center of each side.
Then we worked our way out toward the corners. I don't have any good photos of the corners. What we did was once we got the first corner folded flat and stapled down we used that corner as the model for the other corners. You have to pick a side which has the creased fabric exposed. We made sure the two on the same side were angled the same way. I'm not sure anyone will ever notice, but it seemed like the right thing to do. You can see one way to do the corners here or google around a bit.
Finished project!
Renae has wanted to hang fabric stretched over a frame on the wall for awhile now. Recently, I get a Kreg Jig Pocket Hole System
Over the weekend we had some time to actually stretch the fabric over the frame. (We had to buy a staple gun, since we couldn't find our old one.)
 |
| From Wall hanging craft project |
You can see the pocket holes in the photo. We had the fabric facing up so we could approximately center it how we wanted.
 |
| From Wall hanging craft project |
Cutting it out.
 |
| From Wall hanging craft project |
We put a single staple in the center of each side.
 |
| From Wall hanging craft project |
Then we worked our way out toward the corners. I don't have any good photos of the corners. What we did was once we got the first corner folded flat and stapled down we used that corner as the model for the other corners. You have to pick a side which has the creased fabric exposed. We made sure the two on the same side were angled the same way. I'm not sure anyone will ever notice, but it seemed like the right thing to do. You can see one way to do the corners here or google around a bit.
 |
| From Wall hanging craft project |
Finished project!
Saturday, January 22, 2011
Cat discovers faucet

I'm trying hard to limit the number of times I use the cats as models. But sometimes the opportunity is too good to pass up!
Recently the cats discovered that water dripping out of a faucet is a great source of entertainment. Fortunately for us (unfortunately for them), none of our faucets drip unless we intentionally let them. Renae lets them play with a dripping faucet for awhile and then shuts it off.
The downstairs bathroom has a vessel sink made of thick clear glass. I shot this photo looking up through the glass bowl towards the side with the faucet.
Tuesday, January 18, 2011
Home card catalog

This is the card catalog that I have in my room in the basement. It came from a college in Chicago (not one that I've ever worked for or been to) by way of a craigslist find soon after we moved in to the house. I posted a fuzzy photo of it to facebook then, and I think it deserves better, so this is my first attempt at a better photo.
What's great about having a card catalog is that it's like having 60 junk drawers in one unit. What's bad about having a card catalog is that it's like having 60 junk drawers in one unit. Usually I can find exactly what I'm looking for. Sometimes, I forget what I've put in the drawers. Eventually, I'll get around to organizing and labeling the drawers. For now, I'm just enjoying it as is.
Monday, January 17, 2011
Cat-proofing

This is what our living room has looked like for the past three weeks. Renae put tape on the sides of the couch, ottoman, and all the dining room chairs. She also covered all the couch and ottoman with towels and blankets. So far, the cats have been pretty good about not scratching the exposed parts of the furniture. We're planning to slowly remove the towels and tape over the next few weeks. Since they have plenty of scratching posts we're crossing our fingers that they will leave the furniture alone.
What android apps to use?
Sometimes friends and family ask what apps I recommend for their smartphones. Renae and I have been using the Motorola Droid since the day it was released in 2009. I have downloaded and played with a LOT of apps. Sometimes I have really good recommendations for apps to try out, and sometimes my mind goes blanks.
My most valuable apps
View this Android app list on AppBrain
Honorable mention apps
View this Android app list on AppBrain
View this Android app list on AppBrain
Over the weekend, I found Lifehacker's round-up of their best posts about android from 2010. I'd recommend any android user at least look through the first two posts on this list.
One of the new apps I discovered from those posts is AppBrain. AppBrain is primarily a way to find the best android apps in a way that is easier than browsing or searching the Android Market. But it also provides ways to sort through apps you have installed on your phone and easier ways to install/uninstall apps, depending on your phone.
I've used AppBrain to assemble a list of apps that I would recommend to family and friends. Check it out below. Or, see the entire list of every app I currently have installed on my phone.
I've used AppBrain to assemble a list of apps that I would recommend to family and friends. Check it out below. Or, see the entire list of every app I currently have installed on my phone.
My most valuable apps
- Barcode Scanner : I use this app all the time for scanning product barcodes and QR codes for looking up URLs.
- Droidlight LED Flashlight : Renae convinced me that I would use this app. After downloading it, I can't believe that I went so long without it. I never need to look for a flashlight if I have my phone.
- Cozi Family Organizer : We are using this app to coordinate our calendars and keep track of a single shared grocery shopping list.
- Key Ring Reward Cards : I store all of my store membership/loyalty bar codes with this app. It includes a bar code scanner to help enter new codes. If you use this, turn the brightness on the screen way down so it can be scanned easily at the store.
- Slacker Radio : I like slacker radio better than pandora because I can listen to stand-up comedy as well as music.
- TWIDROYD PRO for Twitter : My preferred twitter client.
- Springpad : Store notes, tasks, recipes and much more with this app.
- Listen : Podcast player. Currently in beta, so expect bugs.
View this Android app list on AppBrain
Honorable mention apps
- Shazam : Don't know what the tune is called that you're hearing on the radio? Use this app to try to figure it out.
- My Tracks : Uses GPS on your phone to keep track of a route you have traveled. Useful for running, biking, or hiking.
- Groupon : Sync with your groupon account.
- AppBrain App Market : Better app browsing and management. I like this app more and more every day.
- Google Goggles : Take a photo of an object and landmark and use google to help identify it.
- Kindle for Android : Ebook reader. (I like the other ebook readers on Android, too.)
- Google Reader : The really cool feature of this app is that you can use the volume buttons on the phone to quickly scroll through your feed items.
- Blogaway : One of the better blogger clients for the android operating system.
- Gmote 2.0 : Control your tunes playing on your desktop computer from your phone.
View this Android app list on AppBrain
Apps for nerds
- Subsonic Music Streamer : I'm using this app to stream all of my mp3s from my home network to my phone. Love it!
- Tuner - gStrings Free : This is a great little tuner app. (For music nerds.)
- Comics : This app is a good comic book reader. It has an integrated store which works really well, too.
- Virtual Recorder
- MyBookDroid - books library : I use this app to keep track of my books and sync with goodreads.com.
- GeoBeagle: Geocaching : Do you like to go geocaching? This app helps you plan which caches to go looking for.
- deciBel : This is a sound level meter. It is not calibrated for scientific use, but it's pretty good for relative sound level measurements.
- Scientific Calculator : This is my favorite scientific calculator app.
View this Android app list on AppBrain
Tuesday, January 11, 2011
Leaky drain!
Last week, Renae discovered that our kitchen sink drain had sprung a leak. It was a slow leak and she mopped up the mess, put a bowl down to catch the leak, and we mostly stopped using that side of the sink for a couple of days. After a few days I had enough time at night to tackle the problem.

The above photo is what the drain looked like before I started. Note the black smear around the joint right above the trap coming out of the garbage disposal. That's where the leak was coming from.
I tried just tightening the joint by twisting the "nut" part, but it didn't help. Then, I removed the trap and the piece above it, so I could get a better look. (The top white piece is a 90 degree turn which connects to the galvanized pipe. It was not leaking so I didn't want to touch it, if possible.)
The problem was that the extension piece which connected the trap to the 90 degree piece had been incorrectly installed. The straight piece had been cut and the end of the trap it was connected to was not designed to allow a straight piece to connect to it. The trap is designed for a 90 degree piece to be connected to it with a long end on it to go directly to the house drain. But, in our kitchen the drain pipes were too high to do that. So I can't blame the previous home-owner for putting in the extension.
What I can blame him for was how he tried to make the joint watertight. There was a thin bead of caulk used to "seal" the pipe. I'm no plumbing expert, but I'm pretty sure that is not a recommended use for caulk.
I went to the home center and stared at the wall of drain fittings for a good half hour. This type of fitting is called a "slip joint". It is really simple to assemble and disassemble (for cleaning the trap if needed). But the fittings only go together in certain ways. Finally, I was able to use a flexible (bendy) tube to make it work.

The photo didn't turn out as well, but hopefully you can see I went from the trap (which is now turned out toward the camera in this photo) to a 90 degree fitting (as the trap is designed) to the flexible pipe to the 90 degree fitting which connects to the galvanized drain pipe.
So far, no leaks.
Subscribe to:
Posts (Atom)